Theming Step By Step
This page will guide you through creating a theme using CSS Loader
Prerequisites
- Knowledge of CSS and JSON
- If you don't know CSS, W3Schools docs are a great starting point.
- CSS Loader
- Instruction for installing CSS Loader on Steam Deck or Windows can be found here.
- If you are on Steam Deck, it is recommended to have an external monitor or PC/Laptop for developing.
- When developing on a different device than the one running CSS Loader, you should have knowledge of how to transfer files between your current device and your Deck.
- First, enable ssh on the Steam Deck using Konsole on desktop mode:
sudo systemctl enable sshd && sudo systemctl start sshd. Then, on the external PC/Laptop install WinSCP, and enter your Steam Deck IP, username (by defaultdeck) and password. Steam Deck IP can be found in system settings, under your WIFI connection.
- First, enable ssh on the Steam Deck using Konsole on desktop mode:
- When developing on a different device than the one running CSS Loader, you should have knowledge of how to transfer files between your current device and your Deck.
- Visual Studio Code
- Downloads for VSCode can be found here.
- Additionally, we recommend the use of extensions to help you write error-free JSON and CSS.
- CSS Loader for VSCode gives you descriptions of all of the properties in a
theme.jsonfile. - Error Lens helps you to spot errors in both CSS and JSON files.
- CSS Loader for VSCode gives you descriptions of all of the properties in a
Introduction to CSS and Steam UI
Desktop Steam, as well as the Big Picture/Steam Deck UI are written as webpages. Being webpages means that you can style them using web languages, namely CSS. CSS, or Cascading Style Sheets, is a language that defines rules for how a webpage should look.
For example, consider the following css rule:
p {
  color: black;
  background-color: lightblue;
}
This rule states that all paragraphs, or <p> elements, will have a light blue background with black text.
This is a paragraph element with the above styling applied
Under the hood, Steam uses version 85 of the Chromium Embedded Framework (CEF). This makes it near-identical to any installation of Google Chrome version 85.
Additionally, just like a regular browser, CEF can open multiple tabs. Steam uses this feature to display different parts of the UI.
Here's an example of the tabs the Big Picture Mode UI uses:
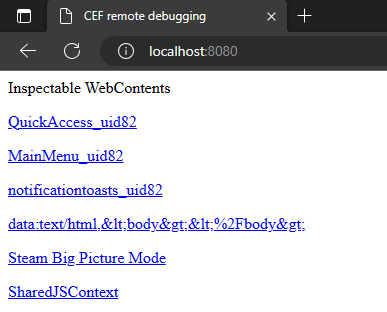
QuickAccess_uid(number): When the button is pressed, this tab is displayed. CSS Loader offers a shorthand for this tab calledQuickAccess.MainMenu_uid(number): When theSTEAMbutton is pressed, this tab is displayed. CSS Loader offers a shorthand for this tab calledMainMenu.notificationtoasts_uid(number): When a notification shows up in the bottom right, this tab is displayed. You can target this tab using the definitionnotificationtoasts.*.data:text/html(...),(Steam store page name): Whenever a webpage is displayed, like the steam store, this tab is used. CSS Loader offers a shorthand for this tab calledstore.Steam Big Picture Mode: The main content window of BPM. If it isn't in a sidebar menu, it's likely displayed here. CSS Loader offers a shorthand for this tab calledbigpicture.
Target Meanings
Targets can be confusing, especially if it's your first time creating a theme. We recommend going down this list from top to bottom and choosing the first target you see that fits your theme.
Desktop Themes
If your theme targets the desktop client, you must choose one of these targets. Otherwise, your theme will be recommended for Big Picture Mode and Steam Deck.
- Desktop-Friends - Your theme only changes the contents of the Friends List.
- Desktop-Library - Your theme only changes the contents of the Library tab.
- Desktop-Store - Your theme only changes the contents of the Store and Community tabs.
- Desktop-Tweak - Your theme only changes a small part of the desktop client, like a font change or hiding an element.
- Desktop - Your theme changes many parts of the desktop client, including those mentioned above.
Big Picture Mode Themes
If your theme targets the Big Picture Mode and Steam Deck UI, it should fit in one of the following categories.
- Background - Your theme only applies a background to an existing element, like the Recent Games section or Lock Screen.
- Keyboard - Your theme only changes the default keyboard.
- Downloads - Your theme only changes the contents of the Downloads tab.
- Friends and Chat - Your theme only changes the contents of the Friends and Chat tab.
- Home - Your theme only changes the contents of the Home tab.
- Library - Your theme only changes the contents of the Library tab.
- Lock Screen - Your theme only changes the contents of the Lock Screen.
- Media - Your theme only changes the contents of the Media tab.
- Settings - Your theme only changes the contents of the Settings tab.
- Store - Your theme only changes the contents of the Store tab.
- Snippet - Your theme is CSS-only and is an extremely minor change, like moving the keyboard to the top of the screen.
- Tweak - Your theme only changes a small part of the BPM client, like changing the volume slider or loading animations.
- System-Wide - Your theme changes many parts of the BPM client, including those mentioned above.
- Other - Any other changes not listed above.
The Format of a Theme
CSS Loader is made to inject CSS into Steam tabs. In order to know what css files to inject where, it uses a definition file called theme.json. If you want to learn about all of the features you can use in your theme.json, check out the Features page.
CSS Loader considers all folders in ~/homebrew/themes that have a theme.json in the root of that subfolder themes. Usually, themes have the following structure:
homebrew
└── themes
    └── My Epic Theme
        ├── theme.json
        └── shared.css
It's time to create the file structure for your theme:
- Open the themes folder
- On Windows, open
CSSLoader Desktop, navigate to theManagetab andOpen Themes Directory - On Steam Deck, navigate to
Home (~) > homebrew > themes - Create a new folder. The name of this folder should be the name of your theme.
- Inside this folder, create two files:
- theme.json
- shared.css
Setting up the theme.json
Open theme.json inside Visual Studio Code, copy the following JSON into it, and modify the values to what you want them to be.
{
  "name": "Name of your theme",
  "author": "Your username",
  "version": "v1.0",
  "description": "A description to your theme",
  "target": "Other",
  "manifest_version": 8,
  "inject": {
    "shared.css": ["bigpicture", "QuickAccess", "MainMenu"]
  }
}
name: The name of your theme, this should be the same as the name of the folder it is in.author: The author of your theme. (probably yourself)version: The version of your theme. It's recommended to follow semver semantics.description: The description of your theme. This can also be provided later when you submit the theme to deckthemes.com.target: The target of your theme. This can also be changed during submission.manifest_version: Defines the features you can use inside the theme.json. The latest manifest version is 8 and we recommend that you always use the latest version.inject: Defines which files gets injected into which tabs. Each key represents the name of the file you would like to be injected, in our caseshared.css. The array behind it contains which tabs it should be injected into. Please replace["bigpicture", "QuickAccess", "MainMenu"]with the tabs you want to inject css into.
After making edits to the theme.json (or any .css file), you need to reload your themes before the changes apply.
Reloading Theme
To manually reload your theme:
- On Steam Deck, open CSS Loader's quick access menu, scroll to the bottom of your theme list, and press "Refresh."
- On Windows, open CSSLoader Desktop, go to the "Themes" tab, scroll to the bottom, and click "Refresh Injector."
You can also let CSS Loader automatically reload using the file watcher feature.
Making CSS Patches
- Connect to the CEF debugger
- Connect to the tab you want to make edits to in the CEF debugger
- Find and test the relevant edits in the CEF debugger
- See Using the CEF debugger effectively for more information on how to to do this.
- Copy your changes to
shared.cssinside your newly created folder on your device. - Reload CSS Loader to load your new theme.
Using the CEF Debugger Effectively
This paragraph will explain some of the features the CEF debugger (which essentially is inspect element for the web-based Steam UI) to help create a theme.
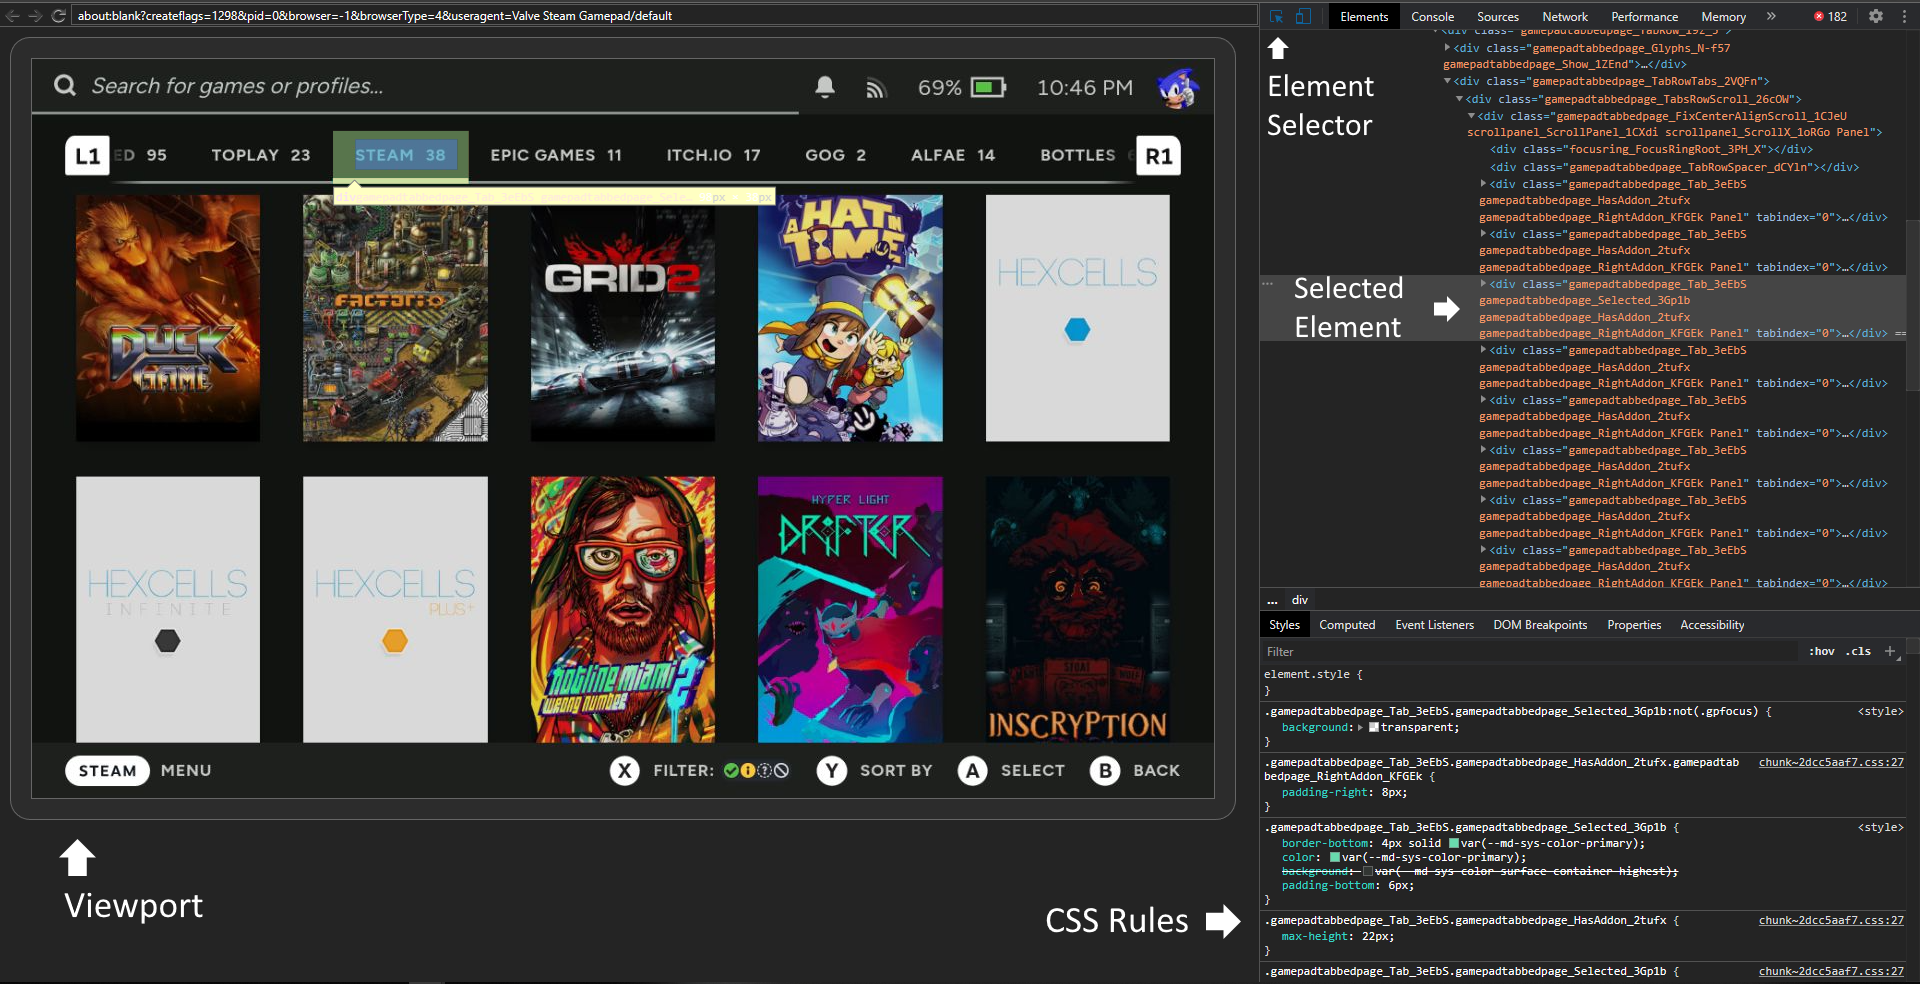
The Viewport gives a visual representation of the currently attached tab. Any CSS edits you do will be displayed in real-time here.
Upon clicking the Element Selector, you can click anywhere in the viewport, and see the HTML element that resides there. This can be used, for example, to find out which specific element is responsible for the background color in an area of the screen.
After clicking on an element with the Element Selector, the Selected Element will appear in the top right panel of the screen. This gives information about the element, such as where it's positioned in the hierarchy of the page and what attributes it has.
After selecting an element, the CSS Rules for that element are shown in the bottom right panel of the screen. This shows, in order from highest to lowest specificity, which CSS rules are applied. Here, you can experiment with applying different CSS properties to elements. This can also be used to find the selectors an element uses, in order to apply specific CSS to that element.
In the above screenshot, the 'Steam' tab is selected, but not currently highlighted. The relevant CSS selector for this is the topmost selector, .gamepadtabbedpage_Tab_3eEbS.gamepadtabbedpage_Selected_3Gp1b:not(.gpfocus)
.gamepadtabbedpage_Tab_3eEbS.gamepadtabbedpage_Selected_3Gp1b:not(.gpfocus) {
  background: red;
}
Closing
If you need any help, feel free to join our discord.
This is just the surface-level, if you wish to explore more features of CSS Loader, continue browsing the docs and the features page.
If you'd like to submit your theme to the DeckThemes site, see the submission documentation